Convert MySQL table’s engine from MyISAM to InnoDB for Django models
When I tried using django-activity-stream for my Django project, I cannot use syncdb, so I migrate it using South. When testing something like :
>>> from actstream import action
>>> action.send(foo, verb='tested')
I got the following error:
IntegrityError: (1452, 'Cannot add or update a child row: a
foreign key constraint fails (`alexadb`.`actstream_action`,
CONSTRAINT `actor_content_type_id_refs_id_357b994e` FOREIGN
KEY (`actor_content_type_id`) REFERENCES `django_content_type`
(`id`))')
It seems the foreign key constraint fail is related to table django_content_type. Therefore, I ran the following MySQL command to check the engine of this table:
SHOW TABLE STATUS WHERE name='django_content_type';
The result for column ‘Engine’ is MyISAM, which is why it does not support foreign key constraint. One solution is to convert it to InnoDB. However, the following MySQL command seems to take a ‘very’ long time (even if it is not a very large table) that I cannot observe for about 5 minutes.
ALTER TABLE django_content_type ENGINE = InnoDB;
To make the conversion quicker, I have to use another solution, which is recreating the django_content_type table with its engine being InnoDB.
This requires the following steps:
In the project directory, dump the app model data associated with table django_content_type. This app and model name is contenttypes.ContentType (django.contrib.contenttypes.models.ContentType).
$ python manage.py dumpdata contenttypes.ContentType > contenttypes.jsonDrop table django_content_type in MySQL:
DROP TABLE django_content_type;
Get SQL statement of model contenttypes.ContentType:
$ python manage.py sqlall contenttypes
BEGIN;
CREATE TABLE `django_content_type` (
    `id` integer AUTO_INCREMENT NOT NULL PRIMARY KEY,
    `name` varchar(100) NOT NULL,
    `app_label` varchar(100) NOT NULL,
    `model` varchar(100) NOT NULL,
    UNIQUE (`app_label`, `model`)
)
;

COMMIT;
Add Engine=InnoDB to the statement, and run this in MySQL:
CREATE TABLE `django_content_type` (
    `id` integer AUTO_INCREMENT NOT NULL PRIMARY KEY,
    `name` varchar(100) NOT NULL,
    `app_label` varchar(100) NOT NULL,
    `model` varchar(100) NOT NULL,
    UNIQUE (`app_label`, `model`)
) ENGINE=InnoDB
;
Load dumped data into database:
$ python manage.py loaddata contenttypes.jsonFinally, the testing of django-activity-stream should work without errors:
>>> from myapp.models import Foo
>>> f = Foo.objects.get(id=1)
>>> from actstream import action
>>> action.send(f, verb='tested')
[(<function action_handler at 0x1102ff410>, None)]
Add static routes on Mac OS X and BSD descendants
Add a static route:
# route -n add -net 192.168.122.0/24 192.168.0.117
This is equivalent to the Linux command:
# route add -net 192.168.122.0 netmask 255.255.255.0 gw 192.168.0.117
List routing tables:
# netstat -r
su, sudo, and environment
sudo -i
sudo -i [command] If command is omitted, it spawns a login shell of the target user (usually root) modifying the environment. Otherwise, the command is passed to the shell for execution.
sudo -s
sudo -s [command]
If command is omitted, it spawns spawns a login shell of the target user (usually root) without modifying the environment. Otherwise, the command is passed to the shell for execution.
This command is useful if you want to keep the environment variables (such as HISTFILE for history) when executing sudo. Use env or declare to see the environment.
Note that if always_set_home is enabled in /etc/sudoers (with a line Defaults always_set_home), after you execute sudo -s, the HOME will be changed to the homedir of the target user, as if you execute sudo -sH.
sudo bash -c
sudo bash -c 'command string'
As a regular user, the following command will fail:
sudo ls > /root/ls.txt
Because although the shell that sudo spawns executes ls with root privileges, the non-privileged shell that the user is running redirects the output.
As a solution, use the following command:
sudo bash -c 'ls > /root/ls.txt'
bash -c spawns a shell that executes the string following the option and then terminates. The sudo utility runs the spawned shell with root privileges (without modifying environment).
su -c
su -c 'command string'
Similar to the previous one, su -c runs a command with root privileges and returna to original shell after execution.
For example,
su -c 'ls > /root/ls.txt'
In conclusion, 1, 2 and 3 uses sudo utility to execute single commands and have the advantage of not requiring root password.
Reference:
Mark G. Sobell. A Practical Guide to Ubuntu Linux, Third Edition. 2010
Create a personal website with Sphinx
Sphinx is a documentation generator which converts reStructuredText files into HTML websites and other formats e.g. LaTeX (PDF) and man pages. It’s also a good idea to create simple static website with Sphinx, for example, a personal profile site.
However, as the default purpose of Sphinx is to create documentation, it requires some customization regarding template structure and style. The following steps help create a simple profile site based on the built-in themes of Sphinx.
Download Sphinx, create a base directory and quick-start Sphinx. It’ll be helpful to answer “yes” to “Create Makefile?” during sphinx-quickstart:
$ easy_install -U sphinx
$ mkdir base_dir
$ cd base_dir
$ sphinx-quickstart
Change site title.
Edit conf.py in the source directory and make the following modifications:
html_title = "YOUR SITE TITLE"
#version = '0.0.1'
#release = '0.0.1'
Comment version and release to prevent this version number from being displayed in titles.
Customize the content structure based on “basic” theme or its derivatives (“default” and “nature”). We take “nature” as an example here.
First, edit conf.py and make the following modifications:
html_theme = 'nature'
html_sidebars = {'**':['localtoc.html','searchbox.html']}
html_sidebars determines the built-in templates to be displayed in the sidebar. For other built-in templates and detailed information, see html_sidebars.
Second, make sure the settings of the following variables:
templates_path = ['_templates']
html_static_path = ['_static']
_templates directory stores template files; _static directory stores static files such as CSS and images. These two directories reside in source directory.
Third, create your own template layout.html inheriting from the default theme:
$ cd source/_template
$ vi layout.html
Edit layout.html:
{% extends "!layout.html" %}
{%- set rellinks = [] %}
{% block rootrellink %}</pre>
<ul>
    <li><a href="index.html">Home</a> |</li>
    <li><a href="resume.html">Resume</a> |</li>
    <li><a href="projects.html">Projects</a> |</li>
    <li><a href="interest.html">Interest</a> |</li>
    <li><a href="contact.html">Contact</a></li>
    <li>{% endblock %}
{% block relbar2 %}
{% endblock %}
The template above creates a header navigation bar of different entries of your sites.

{%- set rellinks = [] %} disables related links (i.e. prev, next and index).
Create reStructuredText (.rst) source files for your entries (index.html, resume.html, projects.html, interest.html, contact.html):
$ cd source
$ vi index.rst
Use the following format, which also applies to other .rst files, such as resume.rst, projects.rst, interest.html and contact.html.
Welcome
*******
Welcome to my site!

About me
========
I am Blah Blah ...

More info
=========
Blah...

.. toctree::
   :maxdepth: 2
Send mails with mutt on Linux
Given that the sendmail MTA is in use on Linux.
Install mutt:
# yum install mutt
# vi ~/.muttrc
Append the following into .muttrc:
set sendmail="/usr/sbin/sendmail"
set use_from=yes
set realname="webmaster"
set [email protected]
set envelope_from=yes
Send email:
# echo "CONTENT" | mutt -s "SUBJECT" -a /path/to/attachment.zip [email protected]
Loop statements in Perl
Loop statement in Perl seems to conform to the TMTOWTDI or “There’s more than one way to do it” philosophy.
The contents below is copied from Chinese Wikipedia article.
Define an array group and we have the following loop statements which perform the same thing:
@group = 1 .. 10;
for (@group) {
    print "$_\n";
}
print "$_\n" for @group;
foreach (@group) {
    print "$_\n";
}
for, which is borrowed from C:
for ($i = 0; $i < 10; $i++) {
    print "$group[$i]\n";
}
while:
$i=0;
while ($i < 10) {
    print "$group[$i]\n";
    $i++;
}
do…while:
$i = 0;
do {
    print "$group[$i]\n";
    $i++;
} while ($i < 10);
until:
$i = 0;
until ($i == 10) {
    print "$group[$i]\n";
    $i++;
}
do…until, borrowed from PASCAL:
$i = 0;
do {
    print "$group[$i]\n";
    $i++;
} until ($i == 10);
map, some kind of functional:
map { print "$_\n" } @group;
GSON simple example of JSON deserialization and use of parser
It seems that JSON-lib is a bit old and requires many dependencies, so I try to have a quick look at Google GSON, which has become the most popular tools for JSON in Java.
{
    "id": "10001",
    "time": "20.1",
    "result": [{
        "name": "John",
        "age": "22"
        },{
        "name": "Jim",
        "age": "23"
        },{
        "name": "Rachel",
        "age": "21"
        }]
}
GsonTest.java
package com.gson.test;
import com.google.gson.*;
import org.apache.commons.io.FileUtils;
import java.io.*;

public class GsonTest {

    public static void main(String[] args) {
        // Deserialize JSON to object
        String txt = "{'name': 'James', 'age': '25'}";
        Gson gson = new Gson();
        Person person = gson.fromJson(txt, Person.class);
        System.out.println(person.toString());
        /*
         * name: James
         * age: 25
         *
         * */

        String r = readToString("/path/to/json.txt");

        // Parse JSON directly (into JsonElement)
        JsonParser parser = new JsonParser();
        JsonObject obj = (JsonObject)parser.parse(r);
        JsonElement id = obj.get("id");
        System.out.println(id); // Prints "10001"

        JsonArray arr = obj.get("result").getAsJsonArray();
        JsonElement p = arr.get(0);
        System.out.println(p); // Prints {"name": "John","age": "22"}
    }

    public static String readToString(String path){
        File f = new File(path);
        try{
            String r = FileUtils.readFileToString(f, "UTF-8");
            return r;
        }
        catch (IOException e){
             e.printStackTrace();
             return null;
        }
    }
}

class Person{
    private String name;
    private String age;

    public Person(String name, String age){
        this.name = name;
        this.age = age;
    }

    @Override
    public String toString(){
         StringBuilder sb = new StringBuilder();
         sb.append("name: " + name + "\n");
         sb.append("age: " + age + "\n");
         return sb.toString();
    }

}
WEP cracking experiment on Ubuntu 12.10
This experiment follows the online basic tutorials at http://www.aircrack-ng.org/ and is done in terms of learning.
Download and install Aircrack-ng suite:
$ sudo apt-get install aircrack-ngStart the wireless card in monitor mode, discover Access Points (AP) and determine a proper target AP:
$ iwconfig
wlan0     IEEE 802.11bgn  ESSID:off/any
          Mode:Managed  Access Point: Not-Associated   Tx-Power=16 dBm
          Retry  long limit:7   RTS thr:off   Fragment thr:off
          Power Management:off

lo        no wireless extensions.

eth0      no wireless extensions.

$ sudo airmon-ng start wlan0
Interface   Chipset     Driver

wlan0       Atheros     ath9k - [phy0]
                (monitor mode enabled on mon0)

$ sudo airodump-ng mon0
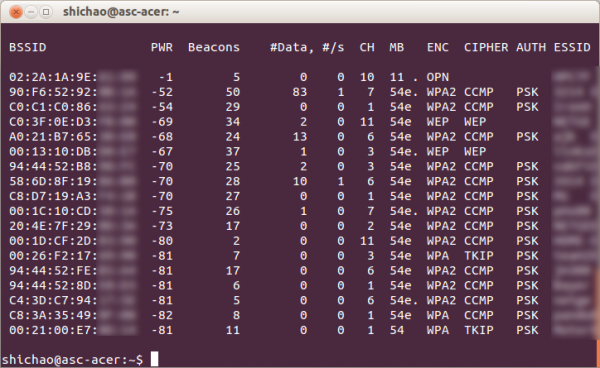
The screenshot above shows the APs on different channels. Choose a WEP target.
Start the wireless interface with the same channel to the target AP.
Assume our target AP has ESSID “TARGET-NET” and BSSID (MAC address) “C0:3F:0E:D3:XX:XX” on channel 11.
$ sudo airmon-ng stop wlan0
$ sudo airmon-ng stop mon0
$ sudo airmon-ng start wlan0 11
Interface   Chipset     Driver

wlan0       Atheros     ath9k - [phy0]
                (monitor mode enabled on mon0)
Test packet injection on the target AP.
$ sudo aireplay-ng -9 -e TARGET-NET -a C0:3F:0E:D3:XX:XX mon0
20:38:56  Waiting for beacon frame (BSSID: C0:3F:0E:D3:XX:XX) on channel 11
20:38:56  Trying broadcast probe requests...
20:38:56  Injection is working!
20:38:58  Found 1 AP

20:38:58  Trying directed probe requests...
20:38:58  C0:3F:0E:D3:XX:XX - channel: 11 - 'TARGET-NET'
20:39:00  Ping (min/avg/max): 1.664ms/6.917ms/39.315ms Power: -78.96
20:39:00  23/30:  76%
Adjust brightness in Kubuntu 12.10 on Acer Aspire One
Fn-Left and Fn-Right do not work to change brightness.
Find the answer here: http://askubuntu.com/questions/112050/acer-aspire-one-d270-can-not-set-brightness
Modify grub config file:
$ sudo vi /etc/default/grub
Change the line:
GRUB_CMDLINE_LINUX=""
into:
GRUB_CMDLINE_LINUX="acpi_osi=Linux"
Then, update grub:
$ sudo update-grub
Reboot
Dual boot Ubuntu and Fedora on laptop
Install Ubuntu 12.10 first and then Fedora 17 on the laptop using USB media.
Install Ubuntu 12.10 with some free space unallocated
Install Fedora 17 in a new partition in the free space
Restart and boot Ubuntu, install lvm for Fedora and update grub:
$ sudo apt-get install lvm2
$ sudo mount /dev/sdaN /mnt
$ sudo update-grub
(/dev/sdaN is the partition for Fedora for the only mount point /)
Reboot