Circumventing Internet Censorship in China
It’s been a while since I went back to China in June this year. This post is intended as a summary of my most recent Internet experience using some very useful bypassing techniques.
AT&T Passport Data
AT&T Passport is the international data roaming plan by AT&T. With this plan enabled, you are able to select available network carriers (such as China Unicom) while in China, but need no further censorship circumvention, as if you were using a non-China network carrier directly. I’m not clear if other mobile network providers behave similarly. However, this method has its limitations of data usage, so you cannot use it freely.
ocserv
OpenConnect VPN server (ocserv) works best of all means. It is fast and stable.
To ease the server-side setup, I used ocserv-docker on a DigitalOcean box and a Linode box. By the time I was setting it up, there was some dependency errors, so I forked it into my own GitHub repo, fixed the errors, and built a Docker image. I ran the following commands on an Ubuntu 14.04 system that uses UFW:
# Add UFW rules
sudo ufw allow 443/tcp
sudo ufw allow 443/udp
sudo service iptables-persistent save
sudo ufw reload

# Install Docker image
mkdir -p ~/ocserv-docker/ocserv
touch ~/ocserv-docker/ocserv/ocpasswd
wget https://raw.githubusercontent.com/shichao-an/ocserv-docker/master/ocserv/ocserv.conf -O ~/ocserv-docker/ocserv/ocserv.conf
sudo docker run --name ocserv -d --privileged -v ~/ocserv-docker/ocserv:/etc/ocserv -p 443:443/tcp shichaoan/ocserv-docker

# Add user and prompt for password
sudo docker exec -it ocserv ocpasswd shichao

# Debug
sudo docker logs ocserv
sudo docker exec -ti ocserv /bin/bash
Then, you can install Cisco AnyConnect clients on both your computer and mobile devices and try to connect your server.
Shadowsocks
Shadowsocks also works well. It’s just that I didn’t bother to set it up my mobile devices, that is, iPhone and iPad. I set up the server side with my Docker image, whose source is shichao-an/docker-shadowsocks-libev.
ExpressVPN
ExpressVPN, one of the best commercial VPNs, is slow and unstable most of the time, which is basically unusable in China.
Pulse Secure
My company provides Pulse Secure SSL VPN. It is usable, but very slow.
Personal Hotspot Backup Plan
Although I have bought two ISPs for Internet access at home and have set up a dual WAN router to use them, it often sucks at busy nights when both ISPs churn me up with an over 80% packet loss for several hours due to a range of crappy outbound nodes of AT&T. These can be easily observed with mtr and ping. In short, I simply cannot use the Internet with a normal mood.
Therefore, I decided to make use of my iPhone’s LTE network via personal hotspot. The problem is to connect to the hotspot from my primary MacBook Pro (named ASC-MBP) while maintaining access to the existing home network (named TOKI-MASTER), since I need accessing the NAS through Ethernet. The obvious way is to hack the routing table, so I wrote the following two scripts, along with a backup plan.
When Internet (both ISP) are down or unstable, do the following:
On ASC-MBP, where Ethernet is plugged to TOKI-MASTER (10.0.1.1):
- On iPhone 6, turn on Personal Hotspot
- On ASC-MBP, turn on Wi-Fi, and connect to ASC-IPHONE6
- On ASC-MBP, run command “switch-default-route”
- If Internet is back up, turn off Wi-Fi, run command “restore-default-route”
By default, the iPhone Hotspot’s gateway address is 172.20.10.1, which is why it is in the script.
UPDATE: February 24, 2016
Turning on/off WiFi and connecting to the hotspot is automated in the scripts. Thus, there is no need to manually connect to the hotspot.
I also created another script sbcsucks.sh that tests whether the ISP is stable. When the ISP is stable with no significant packet loss, the script, which is running on a separate local machine, will send a notification to ASC-MBP. This script can be run in the background using such tools as GNU Screen.
Relationships among nice, priority and weight in Linux kernel
nice value
On Linux, the nice value ranges from -20 to 19.
nice and weight
In the Linux’s Completely Fair Scheduler (CFS), mapping of nice to weight of a process is critical to calculating the virtual runtime (vruntime) of its scheduler entity structure (struct sched_entity). In Linux 2.6.34, this is defined in prio_to_weight (kernel/sched.c#L1356). The weight is roughly equivalent to 1024/(1.25)^(nice):
static const int prio_to_weight[40] = {
 /* -20 */     88761,     71755,     56483,     46273,     36291,
 /* -15 */     29154,     23254,     18705,     14949,     11916,
 /* -10 */      9548,      7620,      6100,      4904,      3906,
 /*  -5 */      3121,      2501,      1991,      1586,      1277,
 /*   0 */      1024,       820,       655,       526,       423,
 /*   5 */       335,       272,       215,       172,       137,
 /*  10 */       110,        87,        70,        56,        45,
 /*  15 */        36,        29,        23,        18,        15,
};
nice and priority
The conversion between nice and static priority (priority for SCHED_NORMAL, or non-“real-time” tasks) is defined by the NICE_TO_PRIO and PRIO_TO_NICE macros. Before Linux 3.15, for example, 2.6.34, this is defined in kernel/sched.c; since Linux 3.15, it is defined in include/linux/sched/prio.h. The relation is literally prio = nice + 120, so the priority ranges from 100 to 139.
The following is the macro definition from the 2.6.34 source code
#define NICE_TO_PRIO(nice)  (MAX_RT_PRIO + (nice) + 20)
#define PRIO_TO_NICE(prio)  ((prio) - MAX_RT_PRIO - 20)
nice value and rlimit style value
In the recent man page on setpriority(2), there is a formula unice = 20 - knice that converts “user” nice values (-20..19) to “kernel” nice values (40..1), which is said to be handled by glibc wrapper functions for setpriority() and getpriority() system calls. This seems vague in definition.
Since Linux 3.16, a new nice_to_rlimit function is added to include/linux/sched/prio.h, which seems to match the above description. This function converts nice value [19,-20] to rlimit style value [1,40]. The formula is equivalent to that on the man page. The rlimit_to_nice does the reverse operation.
static inline long nice_to_rlimit(long nice)
{
    return (MAX_NICE - nice + 1);
}
Here, MAX_NICE is defined to be 19, so it is essentially rlimit = 20 - nice.
Note that the rlimit style value is not to be confused with “user priority” (include/linux/sched/prio.h#L40), which has a range of 0 to 39.
Setting up nss-ldapd on Ubuntu 14.04
The last few posts discussed setting up an OpenLDAP server and configuring basic client server. However, that client server uses nss-ldap with some known issues as presented here. With this old and seemingly buggy setup, I simply can’t make nss_initgroups_ignoreuses option work to bypass querying the LDAP server when authenticating local or system users on the server, and have no idea what nssldap-update-ignoreusers command actually does. When the LDAP server is down or there is network issues connecting the LDAP server, the default configuration will simply block local users from logging in the server (at least for a long time until the query is considered timed out). Also, as I found after checking /var/log/auth.log, it queries the LDAP server even when doing a Bash completion, because it was very slow when I pressed the TAB key after a path name. Setting bind_policy option to soft and timelimit and bind_timelimit to smaller values may just alleviate the symptom but does not solve the problem.
So I decide to use nss-ldapd that comes with the libnss-ldapd package.
apt-get install libpam-ldap nscd ldap-utils libnss-ldapd
Running the above command will automatically remove the libnss-ldap package and prompt interacive post-install steps for you to configure the LDAP parameters. You can disable this interactive behavior and directly place your config in /etc/nslcd.conf with the following command:
export DEBIAN_FRONTEND=noninteractive
apt-get -y install libpam-ldap nscd ldap-utils libnss-ldapd
Then, put your config in /etc/nslcd.conf:
uid nslcd
gid nslcd
uri ldaps://ldap.example.com
base dc=example,dc=com
binddn cn=OpenLDAP Client,ou=users,dc=example,dc=com
bindpw password
tls_reqcert never
nss_initgroups_ignoreusers ALLLOCAL
bind_timelimit 3
timelimit 3
The last line nss_initgroups_ignoreusers ALLLOCAL prevents group membership lookups through LDAP for all local users.
The remaining settings for PAM, sudoers and access.conf are essentially the same as the old nss-ldap setup. Just make sure to restart the LDAP nameservice daemon, nslcd, after making changes to /etc/nslcd.conf:
service nslcd restart
If nscd cache daemon is also enabled and you make some changes to the user from the LDAP, you may want to clear the cache:
nscd --invalidate=passwd
nscd --invalidate=group
The nslcd daemon also has the advantage that it can be easily stopped in order to temporarily disable the LDAP lookup. This makes the management of LDAP access more easy.
Finally, here is the setup script:
Auditing user TTY and root commands with auditd on Ubuntu
auditd can be used to track user commands executed in a TTY. If the system is a server and the user logins through SSH, the pam_tty_audit PAM module must be enabled in the PAM configuration for sshd (the following line must appear in /etc/pam.d/sshd):
session required pam_tty_audit.so enable=*
Then, the audit report can be reviewed using the aureport command, e.g. tty keystrokes:
# aureport --tty
However, the above setup cannot audit users that switch to root using the sudo su - command. In order to audit all commands run by root, as referenced here, the following two lines must be added to /etc/audit/audit.rules:
-a exit,always -F arch=b64 -F euid=0 -S execve
-a exit,always -F arch=b32 -F euid=0 -S execve
And also make sure pam_loginuid.so is enabled in /etc/pam.d/sshd (default in Ubuntu 14.04).
In this way, all processes with euid 0 will be audited and their auid (audit user id, which represents the real user before su) will be preserved in the log. To check the audit log, for example about a user with uid 1000, the following command can be used:
ausearch -ua 1000
The audit.log file is located at /var/log/audit.
Note that before auditing takes effect, the system needs reboot after either installing the auditd package or editing these configuration files. All above were tested on Ubuntu 14.04. Here is a script that can set all these up:
Setting up OpenLDAP client server with SSH access on Ubuntu 14.04
This post documents how to set up an OpenLDAP client server (Ubuntu 14.04) that can make its OpenSSH server to load authorized keys from a pre-configured OpenLDAP server with ldaps:// available (discussed in the previous post, please read this first if you haven’t). Users are able to SSH access this client server, while their SSH public keys are stored on the OpenLDAP server. The SSH authentication process on the client server is mainly facilitated by ssh-ldap-pubkey.
Script
Install packages
apt-get -y install libpam-ldap nscd ldap-utils
apt-get -y install python-pip python-ldap
# https://github.com/jirutka/ssh-ldap-pubkey
pip install ssh-ldap-pubkey
Configure SSH server
Add the following lines to /etc/ssh/sshd_config:
AuthorizedKeysCommand /usr/local/bin/ssh-ldap-pubkey-wrapper
AuthorizedKeysCommandUser nobody
Restart SSH server
service ssh restart
Configure PAM
Edit /etc/ldap.conf:
uri ldaps://ldap.example.com
binddn cn=OpenLDAP Client,ou=users,dc=example,dc=com
bindpw password
Edit /etc/pam.d/common-auth and add the following line:
account required pam_access.so
Edit /etc/pam.d/common-password and remove use_authtok parameter
Edit /etc/pam.d/common-session and add the following line:
session required pam_mkhomedir.so skel=/etc/skel umask=0022
Configure NSS, login access control and sudo
Edit /etc/nsswitch.conf:
passwd:         compat ldap
group:          compat ldap
shadow:         compat ldap
Edit /etc/security/access.conf, replace ldap-team with actual group name:
- : ALL EXCEPT root (admin) (wheel) (ldap-team): ALL EXCEPT LOCAL
Edit /etc/sudoers using visudo command and add the following lines. Replace ldap-team with actual group name:
%ldap-team ALL=(ALL) ALL
Restart nscd
service nscd restart
Setting up OpenLDAP server with OpenSSH-LPK on Ubuntu 14.04
This post documents how to set up a secure OpenLDAP server that is able to make OpenLDAP client servers accept authorized SSH access requests from users. The following steps assume the OpenLDAP server (slapd) and phpLDAPadmin are installed as referenced in the initial setup.
Instructions and references
- Initial setup
- OpenSSH-LPK and ssh-ldap-pubkey (on LDAP clients)
- Force authentication
- Secure LDAP with SSL/TLS
Understanding cn=config (LDAP database)
The default installation of OpenLDAP in recent versions of Ubuntu uses the new runtime configuration (RTC) system or olc (OpenLDAP Configuration). This installation uses cn=config (the LDAP database) for configuration rather than the old style slapd.conf.
Schemas
The schemas can be imported dynamically into cn=config database, without restarting slapd. The schemas to be imported can placed in /etc/ldap/schema.
The following schema in ldif format will be used and discussed in the subsequent sections:
- openssh-lpk.ldif
- ldap_disable_bind_anon.ldif
- ssl.ldif
Importing openssh-lpk scheme
ldapadd -Y EXTERNAL -H ldapi:/// -f openssh-lpk.ldif
where openssh-lpk.ldif is:
dn: cn=openssh-lpk,cn=schema,cn=config
objectClass: olcSchemaConfig
cn: openssh-lpk
olcAttributeTypes: ( 1.3.6.1.4.1.24552.500.1.1.1.13 NAME 'sshPublicKey'
  DESC 'MANDATORY: OpenSSH Public key'
  EQUALITY octetStringMatch
  SYNTAX 1.3.6.1.4.1.1466.115.121.1.40 )
olcObjectClasses: ( 1.3.6.1.4.1.24552.500.1.1.2.0 NAME 'ldapPublicKey' SUP top AUXILIARY
  DESC 'MANDATORY: OpenSSH LPK objectclass'
  MAY ( sshPublicKey $ uid )
  )
Forcing authentication
By default, OpenLDAP allows anonymous query from any client servers. You may want to enable authentication so that only authenticated clients are able to query the server:
ldapadd -Y EXTERNAL -H ldapi:/// -f ldap_disable_bind_anon.ldif
where ldap_disable_bind_anon.ldif is:
dn: cn=config
changetype: modify
add: olcDisallows
olcDisallows: bind_anon

dn: cn=config
changetype: modify
add: olcRequires
olcRequires: authc

dn: olcDatabase={-1}frontend,cn=config
changetype: modify
add: olcRequires
olcRequires: authc
Tunneling RDP over SSH with xrdp and xfreerdp
Suppose you have a remote desktop but you only have SSH access and you need to connect to that desktop with GUI. For example, you have a server at home and you’ve setup port forwarding on your router so that you can SSH to your that home server from office or school, and you don’t want to expose too many ports to the Internet. You can setup xrdp server and tunnel your connection over SSH.
In the following texts, the home server is Fedora 20 and the client laptop is OS X Yosemite.
Install xrdp on home server
On your home server, run:
# yum install xrdp
# systemctl start xrdp.service
# systemctl enable xrdp.service
Configure firewall
Add SSH service and open port 3389 to the current zone and make it permanent. By opening port 3389, you can connect directly to the home server without SSH when your laptop is in the same network at home.
# firewall-cmd --add-service=ssh --permanent
# firewall-cmd --add-port=3389/tcp --permanent
# firewall-cmd --reload
Install xfreerdp using homebrew
Make sure you’ve installed XQuartz. You can download the dmg at http://xquartz.macosforge.org/landing/ .
On your OS X laptop:
$ brew update
$ brew install freerdp
Start SSH forwarding
After you make sure you can SSH to your home server (say 1.1.1.1), you can start SSH forwarding. Run the following command in one terminal session:
$ ssh -qnN -L 3389:127.0.0.1:3389 1.1.1.1
Connect to home server using xfreerdp
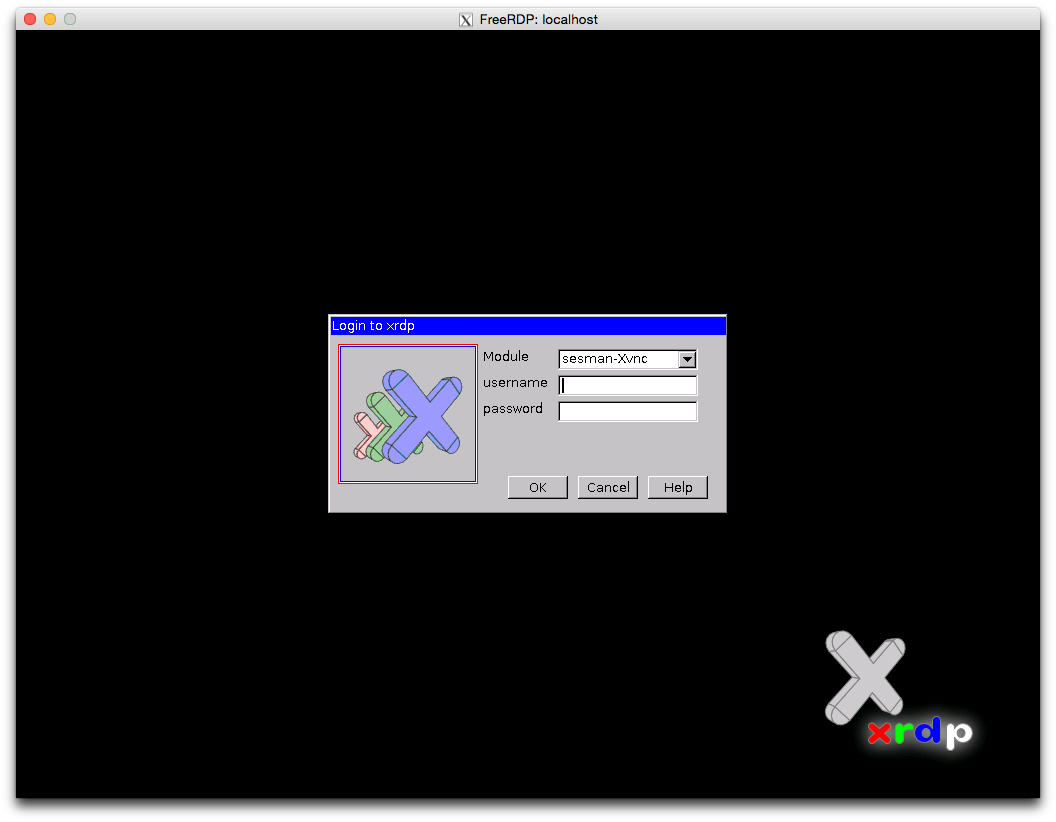
$ xfreerdp localhost
Then, you should have a X11 window show up as in the screenshot below. Enter your username and password to login to your home server.
RabbitMQ clustering and high availability on Ubuntu EC2 servers
Sample
The following setup and configurations were performed on the production servers listed below:
- mq-node1.example.com
- mq-node2.example.com
- mq-node3.example.com
Installation
# apt-get install rabbitmq-server
Hostname and /etc/hosts
On each server, the first priority of setup is hostname and /etc/hosts for internal IP addresses, which are used by RabbitMQ (Erlang) nodes. Use this script (set-hostname.sh) to set the hostname for the corresponding server with the command:
# ./set-hostname.sh -s mq-nodeN.example.com
Then, modify /etc/hosts so that it looks like this (e.g. on mq-node1.example.com):
127.0.1.1 mq-node1.example.com mq-node1
10.0.1.101 mq-node2
10.0.1.102 mq-node3
Ports
Make sure port 5672 (AMQP) and 45000 (we’ll use this later) are open on each server.
Config files
On each server, do the following:
Edit /etc/rabbitmq/rabbitmq-env.conf and add the following (port configuration):
SERVER_START_ARGS="-kernel inet_dist_listen_min 45000 -kernel inet_dist_listen_max 45000"
Edit /etc/rabbitmq/rabbitmq.config and add the following (clustering configuration):
[{rabbit,
[{cluster_nodes, {['rabbit@mq-node1', 'rabbit@mq-node2', 'rabbit@mq-node3'], disc}}]}].
Edit /var/lib/rabbitmq/.erlang.cookie and make sure they are the same on each server.
Reset and start nodes
The RabbitMQ nodes may be already in running state. To put new configuration in effect, we have to reset and restart: First, we reset and stop each node:
# rabbitmqctl stop_app; rabbitmqctl reset; rabbitmqctl stop
Then, start each node in turn. Remember, do this IN TURN, not simultaneously:
# service rabbitmq start
Serving local filesystem using nginx on OS X
Sometimes you may want to access certain files on one computer from other LAN clients using web browsers, for example, a directory of PDF files, or some MP4/MOV videos that can be easily streamed through HTML5 Video.
To make things easy, we can set up an nginx server with Nginx Fancy Index module to serve certain directories on one or more filesystems on your OS X system.
We can install all required software using homebrew and we need to do some hacks on the forumla. The following setup were tested on OS X 10.10.
First, tap homebrew-nginx:
$ brew tap homebrew/nginx
As of writing, the version of fancyindex-nginx-module provided by this formula is 0.3.2, but we need 0.3.3 which allows sorting elements by name (default), modification time. So we need to edit the formula file:
$ brew edit fancyindex-nginx-module
Or, use a text editor to open the formula file:
$ vim /usr/local/Library/Taps/homebrew/homebrew-nginx/Formula/fancyindex-nginx-module.rb
and change https://github.com/aperezdc/ngx-fancyindex/archive/v0.3.2.tar.gz into https://github.com/aperezdc/ngx-fancyindex/archive/v0.3.3.tar.gz.
Then, install nginx by building with the Fancy Index Module:
$ brew install nginx-full --with-fancyindex-module
If brew complains about SHA1 error, then you have to modify the sha1 value of the previous fomula to match the actual sha1 in the error output.
Download FancyIndex Theme to /usr/local/etc/nginx/fancyindex:
$ git clone https://github.com/TheInsomniac/Nginx-Fancyindex-Theme.git /usr/local/etc/nginx/fancyindex
All that remains to be done is configuration. Assume you want to serve /path/to/movies and /another/path/to/pdf directories, you can use alias movies and pdf to point to these locations. Edit /usr/local/etc/nginx/nginx.conf and modify the server block under http block:
server {
    listen       8080;
    server_name  localhost;

    fancyindex on;
    fancyindex_exact_size off;
    fancyindex_localtime on;
    fancyindex_header "/fancyindex/header.html";
    fancyindex_footer "/fancyindex/footer.html";
    fancyindex_ignore "fancyindex";

    location /movies {
        alias /path/to/movies/;
    }

    location /pdf {
        alias /another/path/to/pdf/;
    }

    location /fancyindex/ {
        alias /usr/local/etc/nginx/fancyindex/;
    }
}
The config above is just a minimum configuration. You may add extra configurations (e.g. error_log, error_page) according to your need. Note the paths for the alias directives, there must be trailing slashes, such as alias /path/to/movies/.
Start nginx:
$ nginx
If you make any changes to the nginx.conf, remember to reload:
$ nginx -s reload
You can check whether the port 8080 is in the LISTEN state:
$ sudo netstat -anf inet -p tcp | grep LISTEN
Finally, if you want to keep your firewall on and nginx trusted, run the following command:
$ brew install coreutils  # for greadlink command
$ sudo /usr/libexec/ApplicationFirewall/socketfilterfw --add $(greadlink -f /usr/local/bin/nginx)
You can test from local http://127.0.0.1:8080/movies as well as http://youripaddress:8080/movies and http://youripaddress:8080/pdf from a browser on your LAN clients.
